
coreSTORE - Getting Started: How to add items to the Button Grid
The Button Grid is something on the Sales and PO & Receiving screen that works as quick-buttons to add inventory items to the sale. You can add items to the grid two ways: by assigning the category to the grid, and by tagging individual items.
- Grid Example
Here is an example of what the grid looks like. This example is demonstrating the grid by Category. Each button you see here is a separate category. You can click on each category to see each item inside that category to quickly add it to the sale.

- Click on Tags
Switch between the Category grid to the Tag grid in the top right corner.

- Example of grid by Tags
Here you can see each tag that have been setup in your store. You can click on each tag to see the items which have been assigned to that tag to quickly add them to the Sales/PO & Receiving screen.

How to add categories to the grid
- Click on Inventory

- Click on Categories

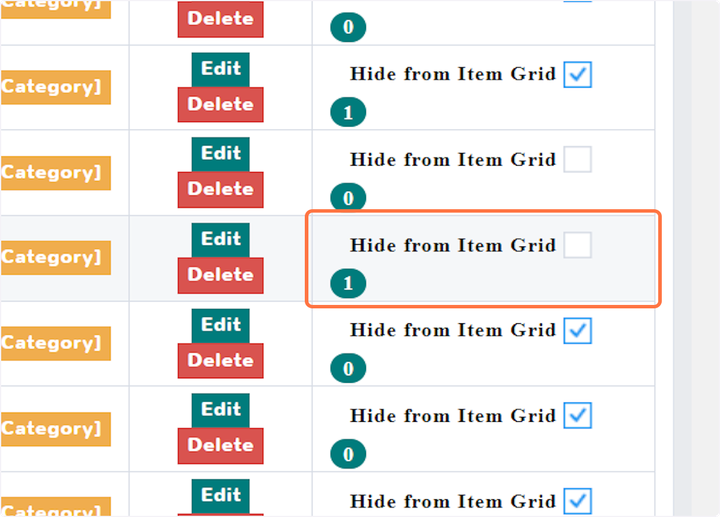
- Hide from Item Grid
Find the category you want to add to the grid and make sure this option is UNchecked.
There is an additional grid setting found by editing the Category
- Click on Edit

- Hide Price On Grid
If this option is not checked, then the price of the item will show on the grid button for each item.

How to add Tags to the grid
First you will need to create tags inside your coreSTORE.
- Click on Inventory

- Click on Tags

- Manage Tags
Here you can see all of the tags that you have created inside your coreSTORE. You even have the option of hiding specific tags from the Grid that you don't want to see on the sales/PO & Receiving screen.

- Click on Add tag

- Configure your Tag

Assigning your Tags to Items
Now that you have some tags made, we'll show how you can assign those tags to your individual inventory items.
- Click on Inventory

- Click on Items

- Click on Edit

- Tags
Type in the Tag you want to associate with this item.

- Create or Assign
After you have typed in the name of the tag, you can actually create a new tag from the inventory item screen if it didn't already exist by click on "Add new tag XYZ" (1).
If the tag does already exist, it will show up as a selectable option which you will need to click (2).

- Associated Tags
Once you have assigned your tag/s they will show up in this field as shown below.

You're all done! Now we'll show you how this new tag is shown on the sales screen.
- Beverages Tag

- Image on the Grid
If you have an image assigned to the item, that image will also show on the grid.

Updated on: 04/02/2025
Thank you!